 niner bakes

Yay, only one week left until Halloween!!
I bet everyone is excited, everyone is preparing the big party, carving pumpkins, getting costumes for their kids and themselves.
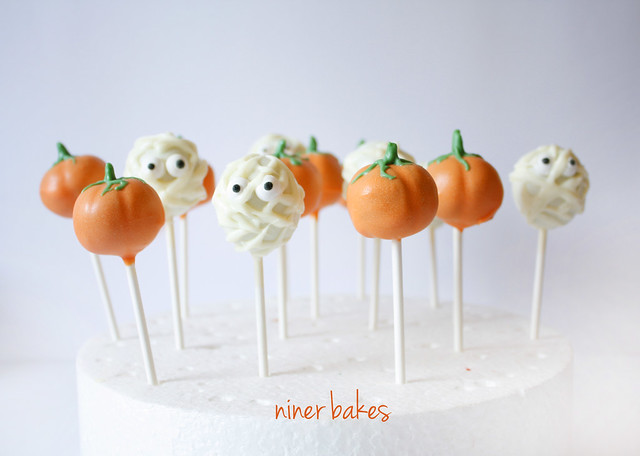
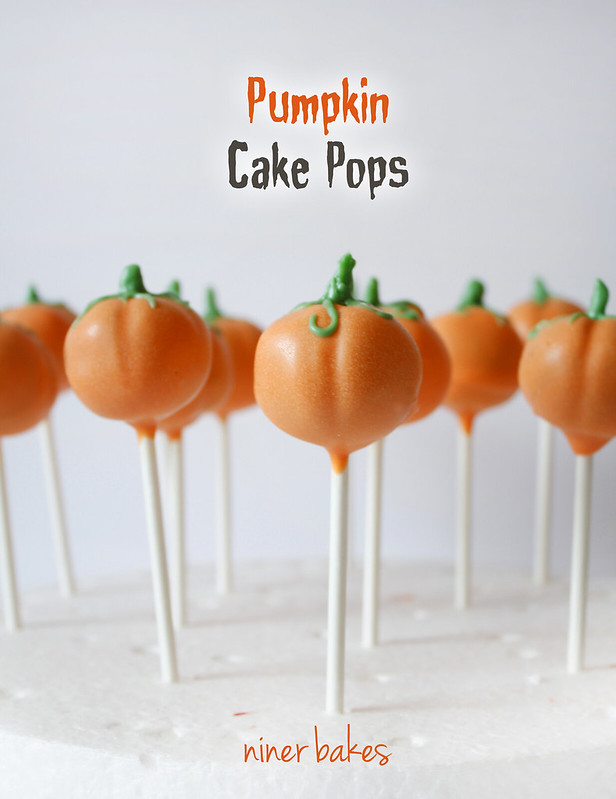
Awesome time of the year! I recently made Pumpkin and Mummy Cake Pops and I wanted to share the recipe and the how to with you guys.
People are just fascianted by cake pops in general, but when there are different sort of shapes for specific holidays and seasons, they are blown away!
You want to make some of these?
Please read on to see the tutorial on how to make those Halloween Cake Pops :-)

- Prep Time 30 minutes
- Baking Time has to be chilled in refrigerator before serving
- Difficulty Medium
To make the pumpkin cake pops you will need:
- uncoated basic Cake Pops, formed like a pumpkin, chilled in refrigerator
- orange candy melts
- green candy melts
- Easy cuttable Soft Candy Sticks or any other soft candy sticks you can find, I used sour ones, so good! Or: little Tic Tacs for the top
- lollipop sticks
- Toothpicks (to add green decorations for the pumpkin tops )
- styrofoam block (to let candy melts dry)
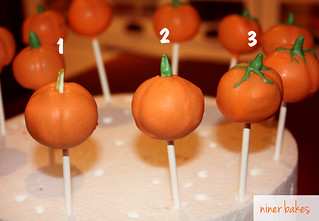
- If you have never made cake pops before, click here. I used my favourite cake pops base, the Oreo version. I prepared the oreo cookie crumbs/cream cheese mix and started to mold the pumpkin shapes: press the cake balls down slightly so that they are squat balls. Now take a lollipop stick or any of your fondant modeling tools (I used the small ball tool) if you have some and indent four or more grooves around each cake ball – once coated with candy melts, it will look just like a pumpkin.
- Melt your orange candy melts in a microwave-safe plastic bowl, following the instructions on the package. Dip a little bit of the lollipop stick into the melted candy, then stick the lollipop stick in the Pumpkin Cake Ball (half way). Prepare all the cake pops just like that, stick them in the styrofoam block and place them in the refrigerator for 30min (or 15mins in the freezer) until they are firm.
- Prepare the pumpkins tops: I used soft sour candy sticks. I cut them in half, so they have a peaky top. You do not have to do it if you use green tic tacs for the top.
- Take a chilled Cake Pop (remove a few cake pops at a time from the refrigerator, keep the rest inside) and dip slowly dunk it in the melted orange candy wafers. Tap off any excess of coating. Now add the top of the Pumpkin to your Cake Pop, either stick in the tic tac, or the prepared soft candy top. Now place the coated Cake Pop in your styrofoam block. Follow the steps with all cake pop pumpkins you got, let them all dry in the styrofoam block.
- See the photo here, you see 3 steps:
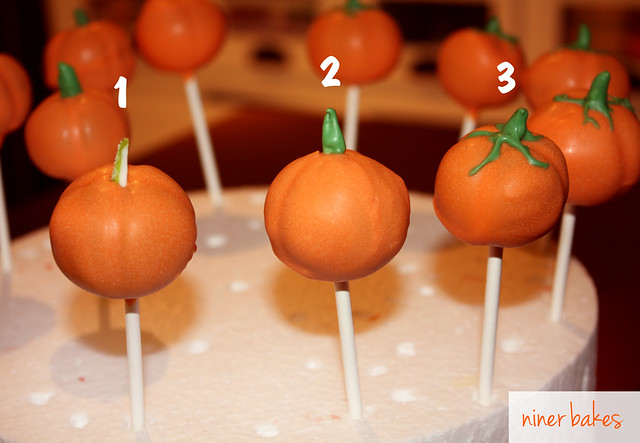
- 1. You coated your cake pop, and stuck in the pumpkins top. 2. When the orange base is dry, you can heat up your green candy melts, take a toothpick and go all around the pumpkins top with the candy melts – I did not want anybody to actually see the soft candy I used. Thats why I coated the top also. 3. Last step: Use a toothpick for green deocrations.
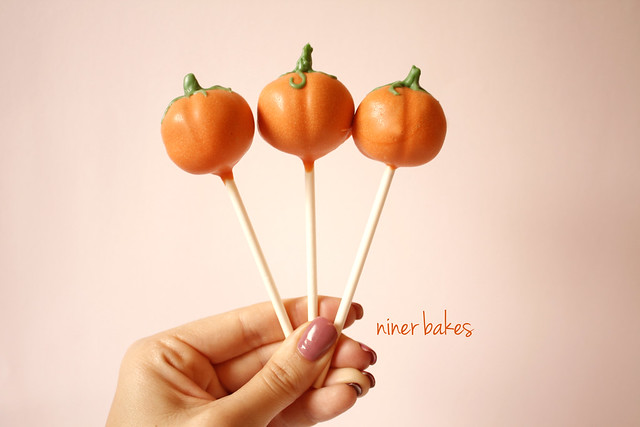
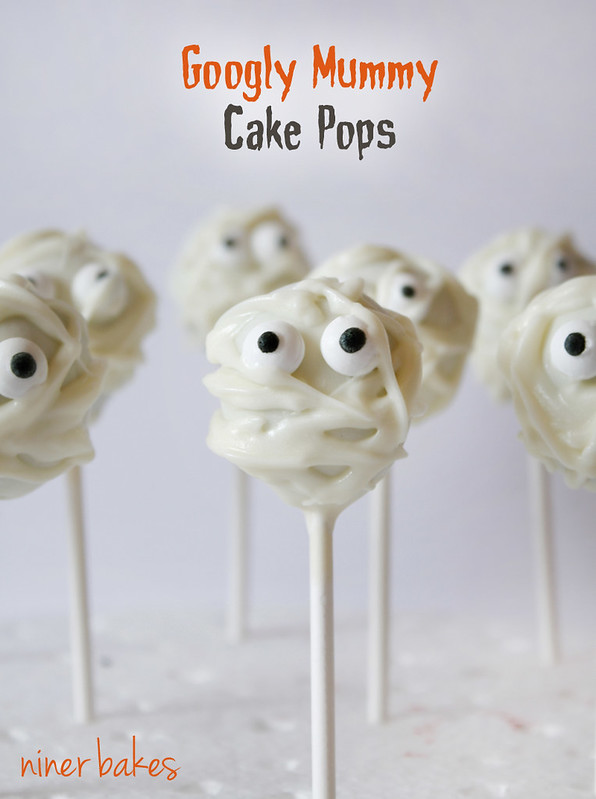
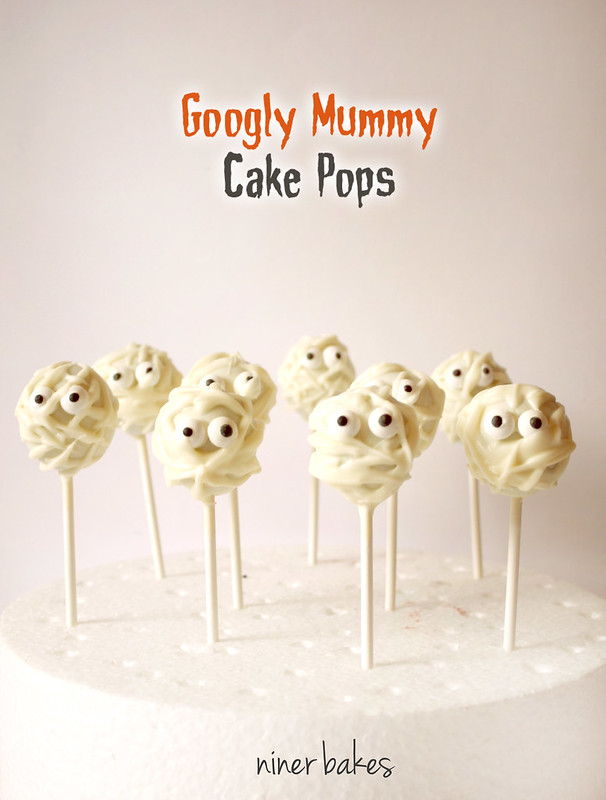
And you are all done. And now, read on for the Mummy Cake Pops tutorial:

- Prep Time 30 minutes
- Baking Time has to be chilled in refrigerator before serving
- Difficulty Easy
To make the mummy cake pops you will need:
- uncoated basic Cake Pops, oval formed, chilled in refrigerator
- white candy melts
- Candy Eyeballs
- lollipop sticks
- Toothpicks
- styrofoam block (to let candy melts dry)
- If you have never made cake pops before, click here. I used my favourite cake pops base, the Oreo version. I prepared the oreo cookie crumbs/cream cheese mix and started to mold the oval mummy shapes.
- Melt your white candy melts in a microwave-safe plastic bowl, following the instructions on the package. Dip a little bit of the lollipop stick into the melted candy, then stick the lollipop stick in the Mummy Cake Ball (half way). Prepare all the cake pops just like that, stick them in the styrofoam block and place them in the refrigerator for 30min (or 15mins in the freezer) until they are firm and dry.
- Take a chilled Cake Pop (remove a few cake pops at a time from the refrigerator, keep the rest inside) and dip slowly dunk it in the melted white candy wafers. Tap off any excess of coating. Take your Eyeball candy and place the eyeballs on the mummy cake pops. Place the coated Cake Pops in your styrofoam block. Follow the steps with all cake pop mummys you got, let them all dry in the styrofoam block.
- Once dry, take a toothpick (or squeeze bottle so you can pipe lines) and run lines of white candy melts across the front of the mummy faces. Maybe a little on top of an eyeball, but do not cover the eyeballs completely. Let it all dry.
And you are all done again!! Let me know if you make those, I would so love to see the outcome! Happy Halloween everybody! Blessings, niner


")


Oh, wow, niner — you’ve outdone yourself again! You are an INSPIRATION!!!
(The only problem is finding white candy melts in time for Hallowe’en, plus the candy eyes. A fun challenge!)
Hi Laura, thank you SO much. What about Amazon? I found both there =)
Hope you can find it so you can make those mummy cake pops and show me =))
Love, niner
You can make the eyes with royal icing.
Beautiful cake pops! You’re very creative. I am glad I found your blog through Food Gawker.
Hi Julia, what a treat to read this morning. Thanks for coming over, glad you found my blog =)
Will head over to yours =)
Love, niner
These are super cute! Thank you for sharing.
Thank you so much Amanda, thanks for stopping by =)
Blessings, niner
Oooo!! Super, super cute!! Such a perfect tutorial as well! Thank you Niner for the how-to, I would love to try these. (Oh and yes, I missed these email messages – happy to see you back!!) xo
We featured these on our Mouth Watering Mondays post, come on by to see at http://www.noshingwiththenolands.com Cheers, Tara
Hi! After I make them, should I keep them in a fridge or is it better to store them room temperature in a tupperware? Thanks!
Hi there Elise, after you are finished, you can keep them at room temperature in a container or put them in the fridge. Please do not freeze them. You can freeze prepared cake balls for example. But finished cake pops, I would not recommend it.
Blessings, niner