 niner bakes

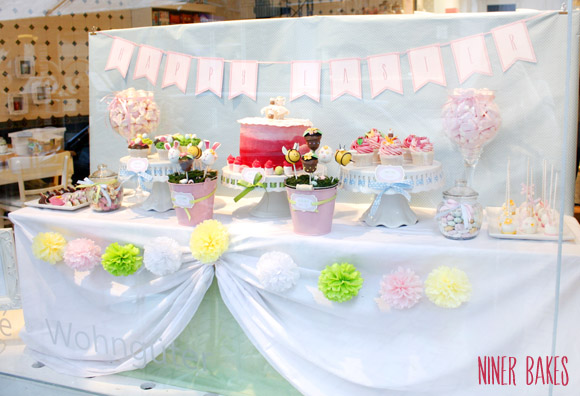
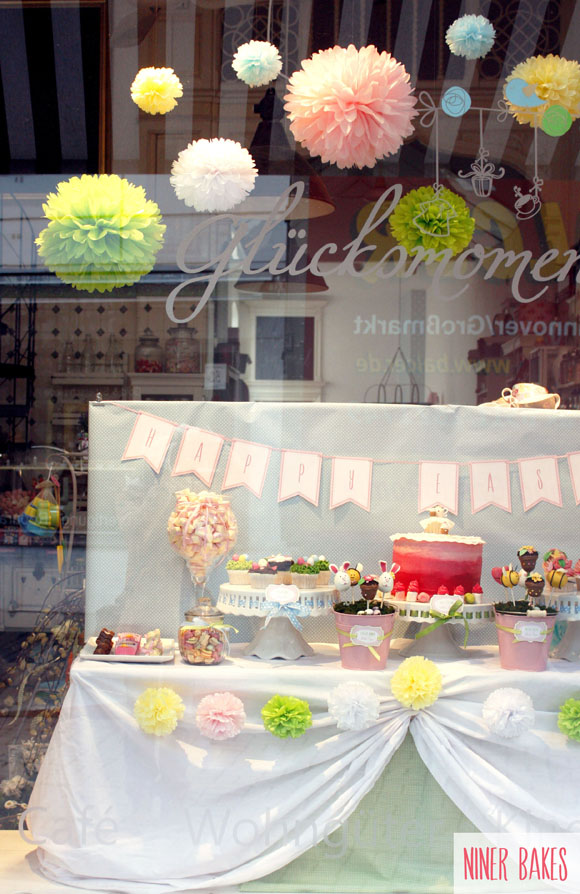
It has been a couple of weeks that we set up the Easter Candy Bar at a café but now I can finally post about it. If you follow my blogposts, you probably have seen my Christmas Candy Bar that we have done in 2012. So for Easter it was only right to make a new sweet table for the café’s window!
You will probably recognize a couple of sweet treats that I blogged about in the past weeks.
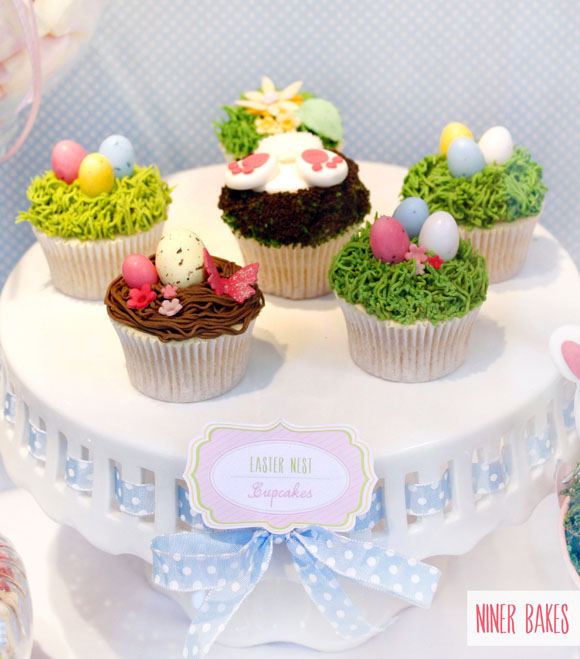
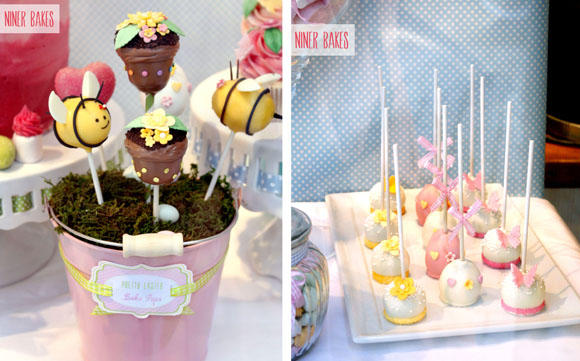
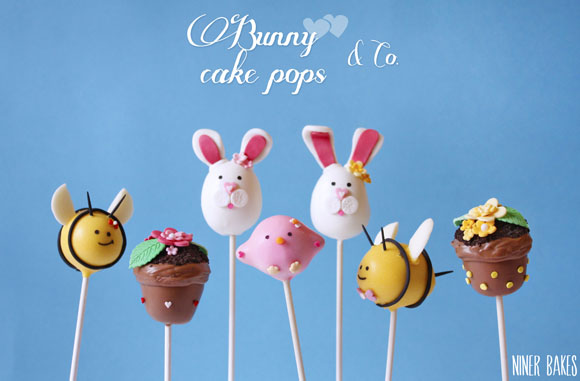
For example my Bumble Bee & Flowerpot Cake Pops, the Simple Easter Egg Cake Pops or my Easter Nest Cupcakes.

Besides all kinds of Easter candy I made Easter Nest Cupcakes + Spring Cupcakes decorated with pretty flowers and leaves and a hidden bunny cupcake.
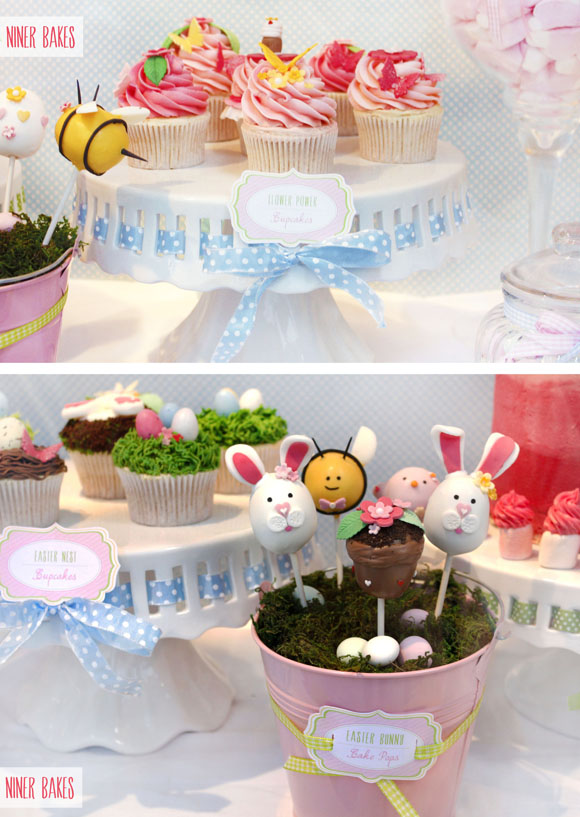
In two pink mini buckets all Cake Pops such as bees, birds, bunnies, hearts and flowerpots, found their spot.
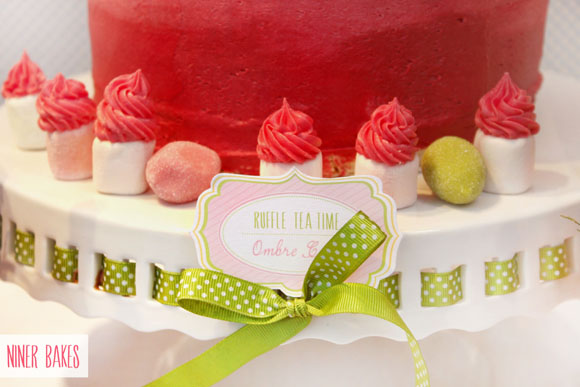
For the center I chose an ombre layer cake in pink shades.

On top, I placed a layer of ruffled fondant. It looked sort of empty so I made a “Tea Time” Cupcake which included a tablecloth with ruffled edges, a teapot plus a little mini cupcakes for dessert :)

Around the layer cake I placed my little “fake” cupcakes made out of marshmallows and regular frosting (read blogpost here).
Not to forget to mention my favourite pompoms, made by PomPom Manufaktur (Online Shop + Facebook Fanpage) who produce such good quality PomPoms! It is a highlight for every sweet table when pompoms are involved. Thanks to Irka & Marcel :)

At the very right we placed a white platter full of Easter Egg & Flower/Butterfly Cake Pops.
I hope you guys enjoyed our Easter Spring Sweet Table :)
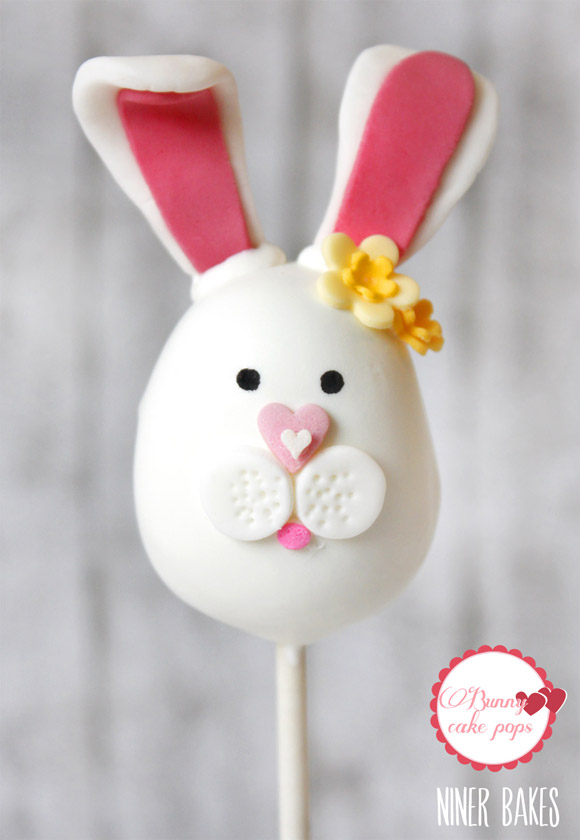
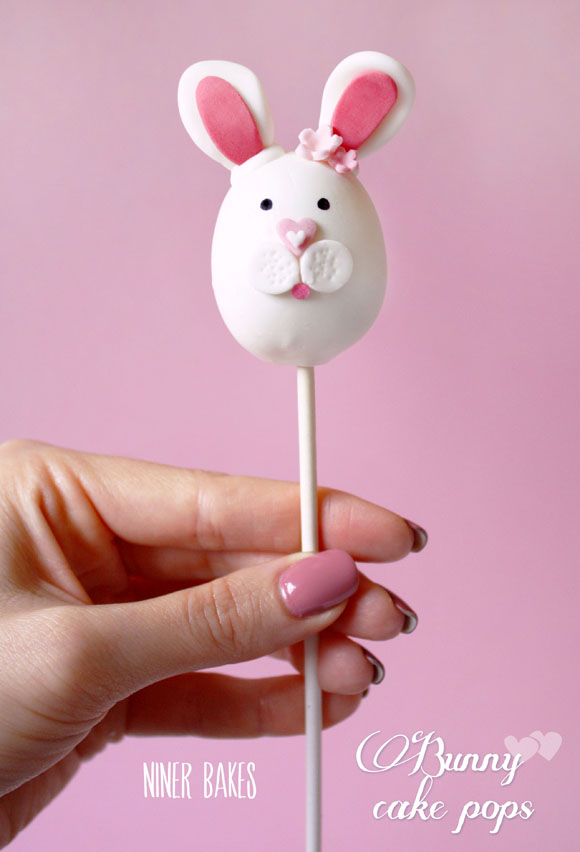
And besides the Easter sweet table, I will show you today how to make Bunny Cake Pops!

If it is the first time you are making cake pops, please visit my tutorial and recipe here.
For the Easter Bunny Cake Pops you need:
- lollipop sticks
- Candy Melts (white) but I recommend super white candy melts (Merckens) or super white candy coating from CK Products
- Bunny ears and noses made out of fondant. If you find candy that looks like bunny ears etc. you do not have to make those with fondant. For example: Candy Corn or sugared almonds which come in many colors, or you can just buy the white almonds
- if you use white fondant for the ears etc., you can use food coloring to color fondant pink for the details of ears and nose.
- fondant flowers or store bought sugar flowers for details
- Confetti Sprinkles (I used pink ones) for the mouth
- Heart sprinkles and Micro Hearts Sprinkles of your choice for details
- edible food pen (for the eyes) or round sprinkles
- tweezers
- gloves
Additional Items you may want to get, makes a nice gift:
- Lollipop plastic covers, to give away
- ribbon for tying, to give away
- 1. Prepare your cake pops as usual or, visit my tutorial and recipe here.
- 2. Shape your cake balls not super round, a little like egg shapes, just like in the photo above, then refrigerate them for at least 10 minutes in the freezer or 30 minutes in the refrigerator to firm up.
- 3. Now melt your white candy melts. I usually do that in the microwave in 30 seconds intervals. If you are having a hard time with the consistency of your candy melts, click here for my Cake Pops 101 Troubleshooting Guide. If your candy melts are too thick, just add a little bit of vegetable oil and stir.
- 4. Get your chilled bunny head shaped cake balls out of the fridge. Dip a little bit of the Lollipop Stick in the melted candy, then stick the Lollipop Stick in the Cake Pop (half way). Let the Pops rest a bit in a styrofoam block or cake dummy so the candy melts set within the cake pop.
- 5. Now dip the whole Cake Pop in the melted candy, shake off all the excess and repeat with all cake pops and let them dry in a styrofoam block.
- 6. Now attach the fondant ears you already prepared ahead of time (or candy that looks like bunny ears, for example Candy Corn or sugared almonds which come in many colors, or you can just buy the white almonds) using white candy melts as glue. Hold on to the ears a bit until they have set.
- 7. Now attach the rest of the “face parts”, such as the nose (heart sprinkles), cheeks and mouth (pink confetti spinkles) using a toothpick to attach precisely. With an edible food pen, paint the eyes.
- 8. For extra cute decoration, attach little sugar flowers under the ears or little bows (2 hearts sprinkles). And you are done! Bunny cake pop mission accomplished! :)
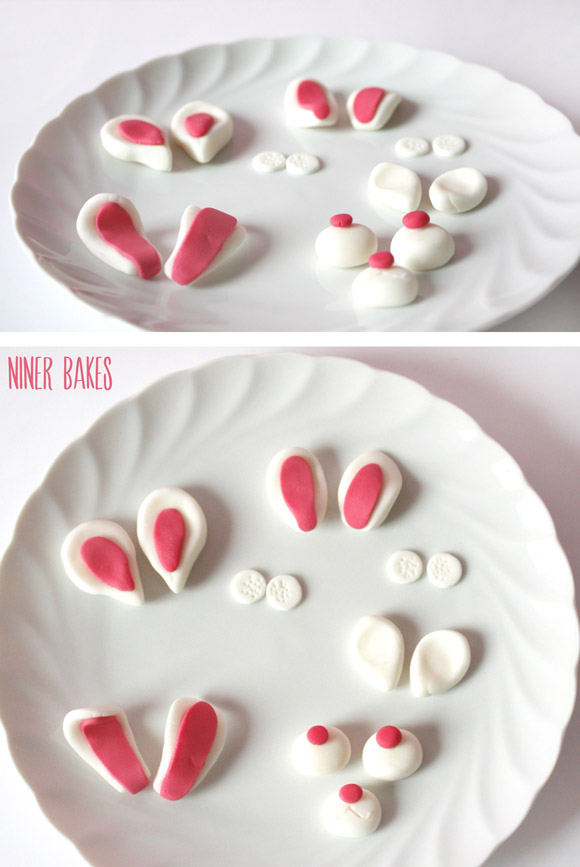
(photo: prepared fondant ears, cheeks etc. – you can make various shapes for the ears, just as you like)
Note: I am in love with the Brite White Candy Melts by CK Products. Your cake pops will be really white and it does make a difference. If you can get those, I really recommend to buy them.
(photo: difference between super white candy coating & regular white candy melts)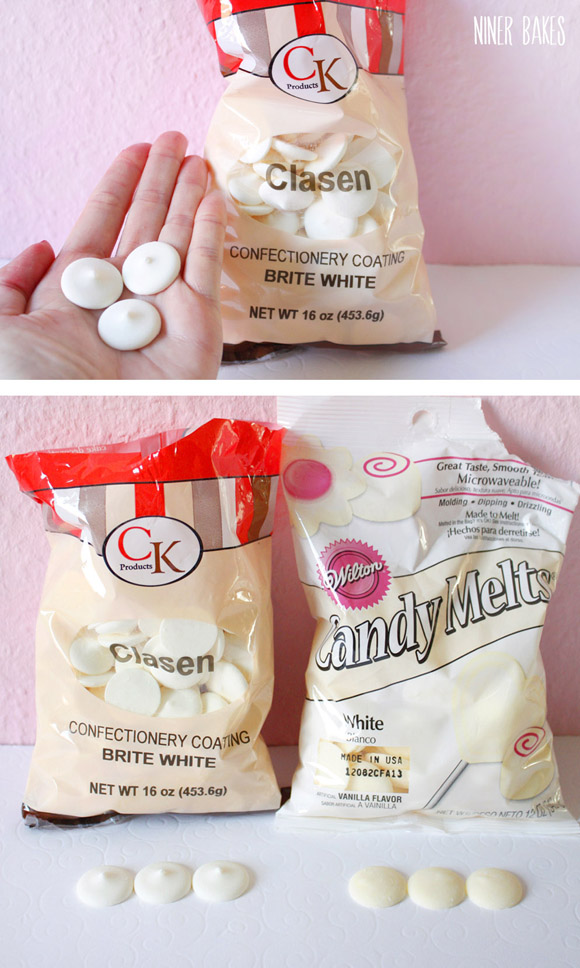
Even if these bunnies are a little late, you can still make them for Easter in 2014, right :-)
Happy baking everyone, until next time,
niner
Products & Vendor Credits:
Styling arrangement: niner bakes & Glücksmoment
Food Tags & Bunting Design: niner bakes
PomPoms: PomPom Manufaktur
List of shopping recommendations:
Lollipop Sticks
Candy Melts (white, Wilton) or super white candy melts by Merckens or the ones from CK Products
Bunny ears: Candy Corn or sugared almonds
Fondant
Food Coloring
Confetti Sprinkles
Heart sprinkles and Micro Hearts Sprinkles
Edible Food Pen
Lollipop Plastic Covers
Ribbon for tying
Styrofoam Block or Cake Dummy
Fondant Tools
Fondant Plunger Cutters
Rolling Pin


Ahhhh!! AMAZING!!! Everything is so beautiful, gorgeous, cute – I LOVE it all!
And those bunny pops… so adorable! Niner, you are one talented girl!
I’m so glad you’re feeling better!
xo,
Marian
Hi Marian, thanks so much for your lovely comment, I am happy you like my Easter treats.
Much love, xoxo
niner
Liebste Nina!
Ich bin vollkommen und absolut begeistert von deinem Oster Sweet-table. Du bist toll, ich bewundere deine tollen Kreationen .
Liebe Grüße
Mareike
Liebe Mareike, das freut mich riesig, dass dir die Oster Treats gefallen – ganz lieben Dank für dein Feedback :)
niner
Oh mein Gott! Ich bin zufällig auf die Idee mit den Hasen gestolpert und wollte nochmal eine deutsche Anleitung. Vielen, vielen Dank das sieht so außerordentlich professionell aus dass ich mich kaum an dieses “Projekt” heranwagen mag. Bis Ostern habe ich ja noch ein wenig Zeit =)
Liebe Grüße
Liebe Anke,
ich wünsche dir viel Erfolg dabei, es ist immer etwas schwierig bei wenig Erfahrung, aber nach und nach wirst du merken, das es immer besser wird.
Wünsche dir vor allem viel Spaß dabei :)
Liebe Grüße
Heya. love these! after you have made them where should they be stored?
Hi Kit,
you can put them in the refrigerator (I like their taste better when they’re chilled) or just leave them on the counter, in a glass filled with sugar, stick them in there :)
Liebe Niner…. Deine Sweet tables sind unglaublich …. Letztes Jahr zu Weihnachten- nun Ostern :-) – die Inspirationen sind überwältigend ….
Liebe Gisela,
ich freue mich sehr, dass dir meine Sweet Tables so gut gefallen – genau so soll es sein, liebsten Dank für Deinen tollen Kommentar :)
Happy baking :)