 niner bakes

Hello everyone,
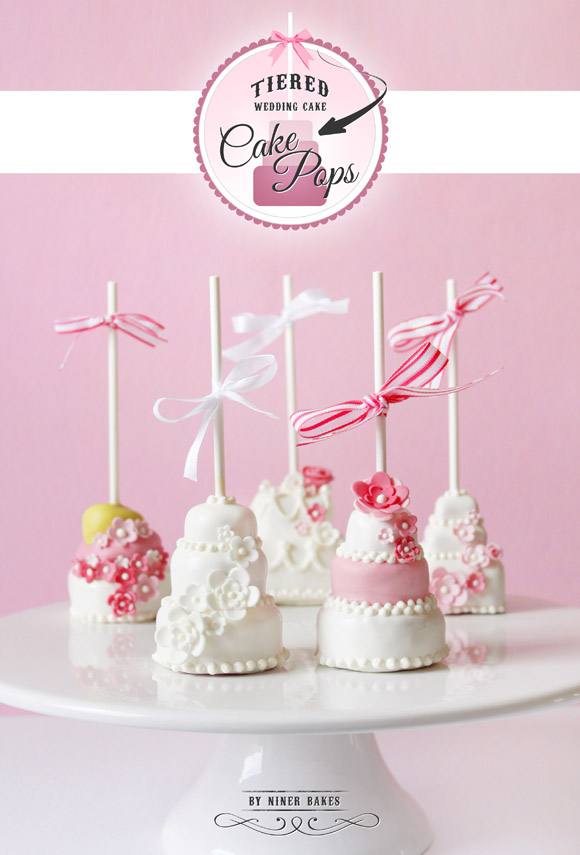
Wedding season is about to start soon and because DO IT YOURSELF things are so popular nowadays and brides want to create so much themselves for their wedding, I thought to come up with a new tutorial for all future wedding couples: Mini 3 Tiered Wedding Cakes – Cake Pops!
My Bride and Groom Cake Pops tutorial was a hit and still is, many readers tried it out so I thought to come up with something new for the Wedding Cake Pop section. Everyone who wants to create treats on their own (a wedding is expensive as we all know), this would be perfect for you!
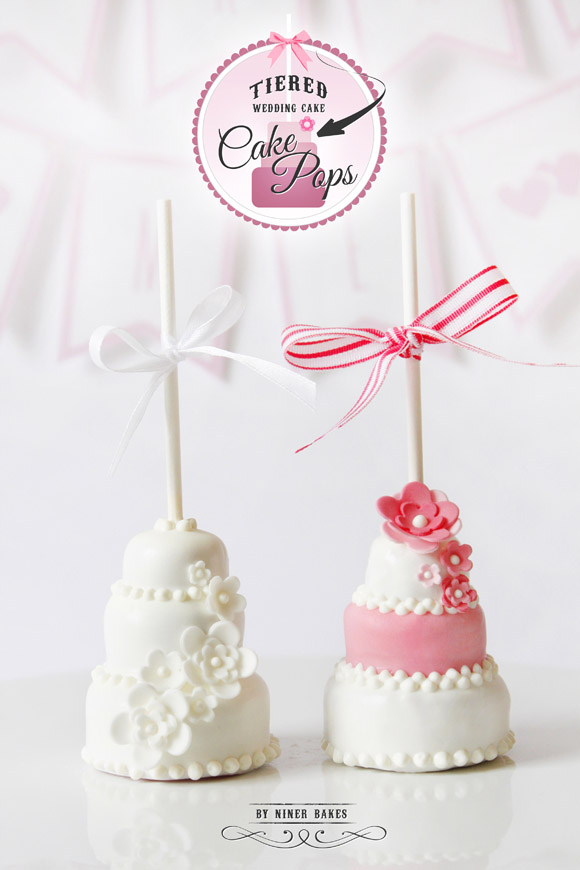
As soon as I finished my first version of a tiered wedding cake – cake pop, I was in love! I was in wedding mode! It happens quickly once all you think about is tiered cakes, researching cakes on the net, making fondant flowers etc.
I hope you will enjoy my tutorial and maybe even give it a try for an upcoming wedding.


- Prep Time 30 minutes
- Baking Time bake your cake of choice
- Difficulty Medium
What you need in order to make the wedding-cake cake pops (not everything is MUST!):
- baked & cooled cake, in 3 different colors if you wish (tinted with food coloring)
- Frosting (for recipes, click here)
- microwave-safe plastic bowl to melt candy coating
- Cup or coffee mug (pour in the candy melts in the cup if your bowl is not deep enough to dip in the whole cake pops
- white candy coating and/or other colors as you wish
- round cookie cutters in 3 different sizes
- squared cookie cutters in 3 different sizes, or printed & cut out paper squares (for squared wedding-cake cake pops)
- sharp knife (to cut out squared shapes of cake)
- premade fondant or gumpaste flowers or store bought sugar flowers
- fondant or gumpaste
- Fondant Cutters: Flowers, Leaves etc.
- Fondant Tools to work with: Rolling Pin, Foam Pads, Ball Tool & other modeling tools
- Lollipop Sticks
- white round sprinkles for decorating
- Wax paper
- Toothpicks
- tweezers
If you do not care about the inside of the cake and different color shades, you can try out my no-bake Oreo Cake Pops recipe, which is less work than the cake version (good for beginners!).
Click here for the recipe
If you do want to make the cake version with different colors, it is important to have a baked & cooled cake ready + frosting.
I baked my cake in a loaf pan, pouring 3 different colored cake batters in the pan. With this amount of cake crumbs, I made 5-6 wedding-cake cake pops. The more cake + frosting you have, the more cake pops you can make.
Note: Take out everything on the counter you need before you actually start. It can be very stressful otherwise.
By failing to prepare, you are preparing to fail. (Benjamin Franklin)
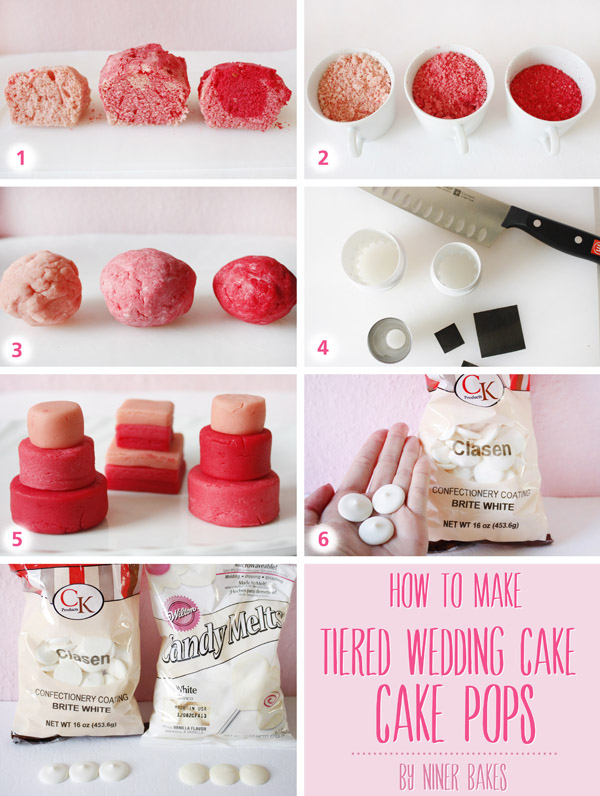
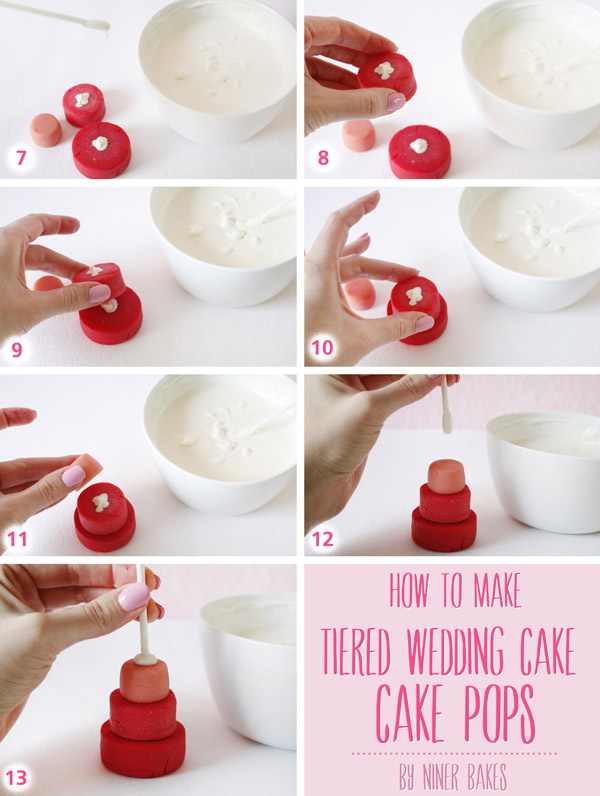
- 1. Sugar flowers made out of fondant: I recommend to make these ahead of time, even days ahead. To roll out the fondant or gumpaste, use a rolling pin. To help shape the gumpaste or fondant flowers, use tools such as the ball tool. The foam pad helps to make and shape sugar flowers.
- 2. Bake your favourite cake (if you want more than one color, you need to bake 2 or 3 cakes with different colors or do what I did, I devided my cake batter into 3 parts and tinted each one with a different shade of pink and baked everything is one pan. Make sure to let the baked cake cool completely (Step 1), then place each cake (remember you have three different colored cakes) into large bowls and break down the cake into fine crumbs,
I usually use my hands for this (gloves) (Step 2).
Now the frosting comes into play. Choose either frosting you like best and add it to your 3 crumbs mixes. The crumb/frosting mix has to have a doughy consistency, sort of like play-dough.
If your mix is too dry, add more frosting. But make sure it is not too soft.
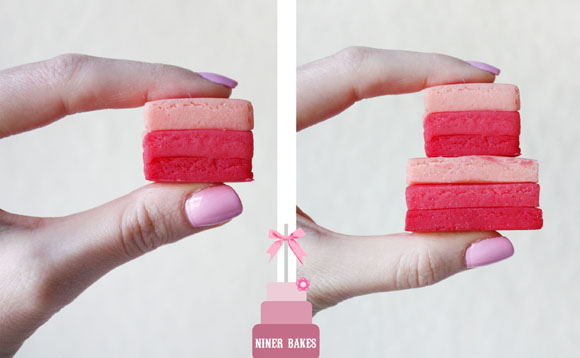
Mix it all well together (step 3) and then start to cut out circular or squared shapes for your wedding cake – cake pops (steps 4 – 5). Place your little cake layers on top of eachother to check whether it looks like you want it, smallest layer is the top of the wedding cake.
Note: Please do not cut out really big shapes of cake, because they might be too big and heavy for the lollipop stick and might fall off. Try to make them just like in my photos for example. - 3. Melt your white candy coating in a microwave-safe plastic bowl, following the instructions on the package, I usually do that in 30 seconds intervals in the microwave.
Note: I am in love with the Brite White Candy Melts by CK Products.
Your cake pops will be really white and it does make a difference. If you can get those, I really recommend to buy them. - 4. Place a small amount of candy coating on each layer and place all layers on top of eachother (steps 7 – 11).
Take a lollipop stick, dip a little bit of the lollipop stick into the white melted candy, then stick the lollipop stick into the top layer of the wedding cake – cake pop all the way down to the bottom, very careful and not too fast. Repeat this step with all of your little wedding cakes.
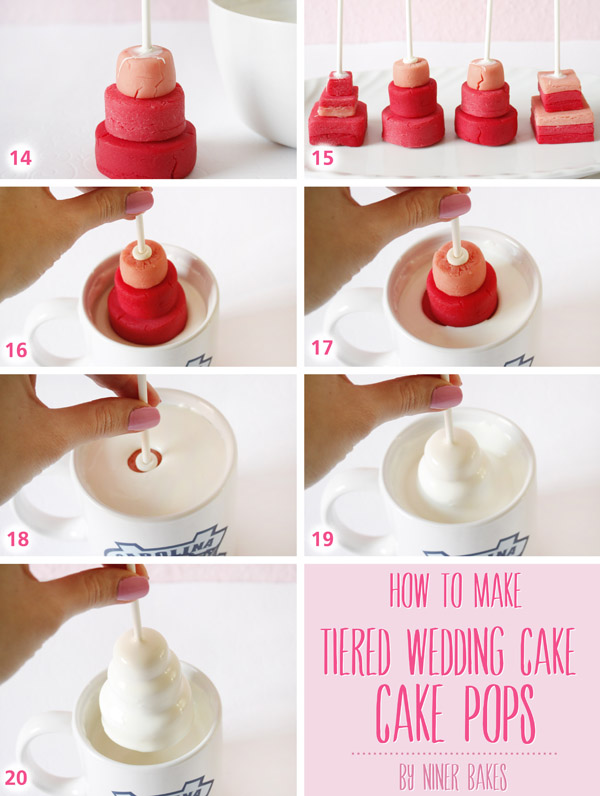
Put all of them in your fridge for about 20 minutes to firm up. - 5. The bowl I used was not deep enough so I transferred the candy melts into a cup so the whole cake pop can be dipped in completely.
Now dip the cake pop into the white candy melts (steps 16 – 20), let the excess chocolate come off. Place the coated Cake Pop on a sheet of wax paper to dry.Follow these steps with all little wedding cake – cake pops, then let them all dry on wax paper.
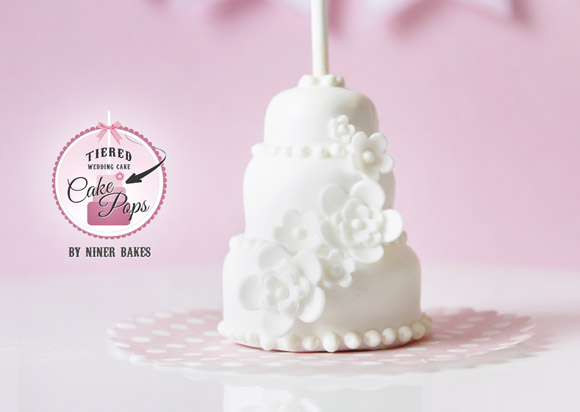
Note: When they are dry, you can place them on a plate, but do not place the wet cake pops onto a plate since it will be hard to get it off once the chocolate has set. - 6. Now it’s time to decorate your little wedding cakes!
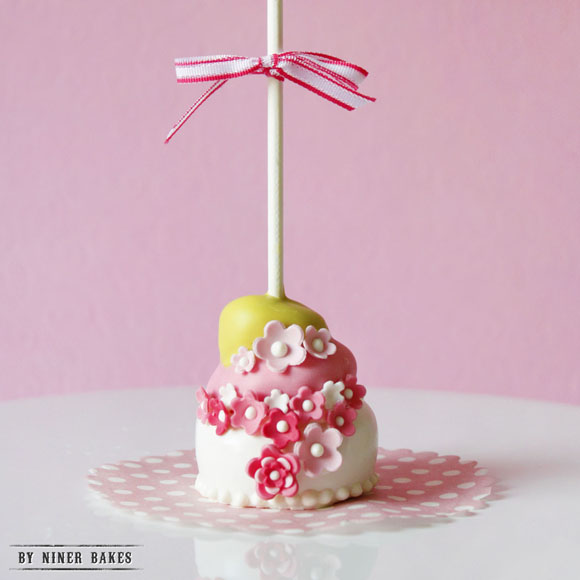
Attach flowers in different shapes or any other candy you like.
You can also pipe little dots around each layer like I did.
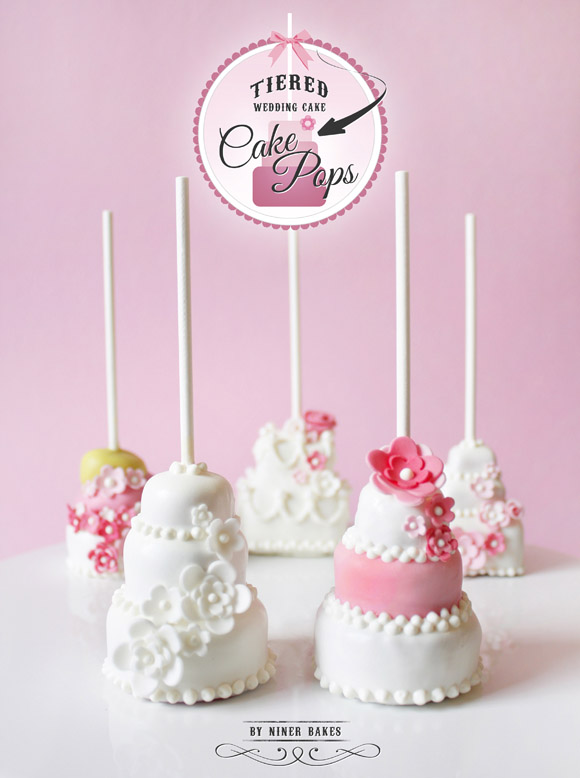
And you end up with a beautiful result, I’m sure!

(Photo: Foam pad, cut out fondant flowers + ball tool to shape the flowers.)
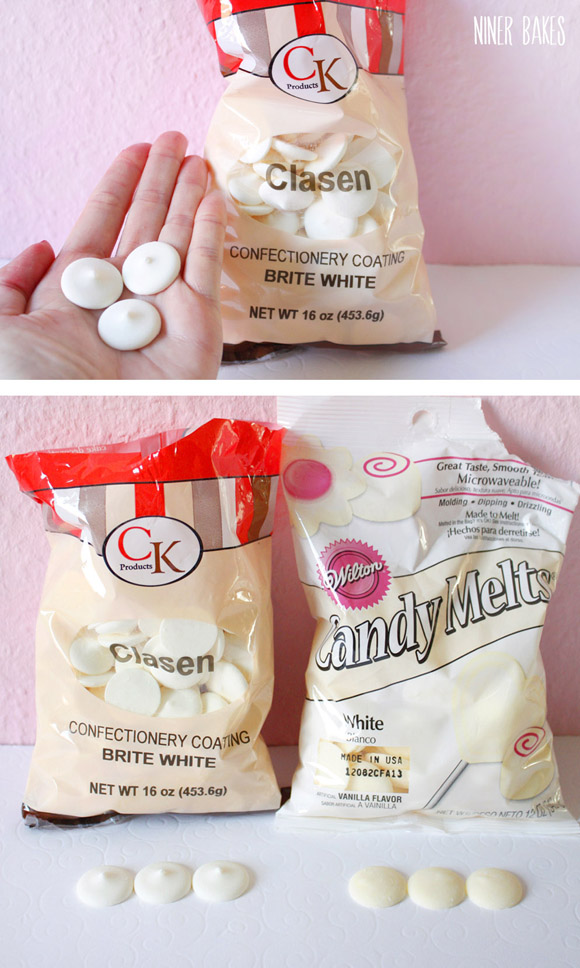
(photo: difference between super white candy coating & regular white candy melts)
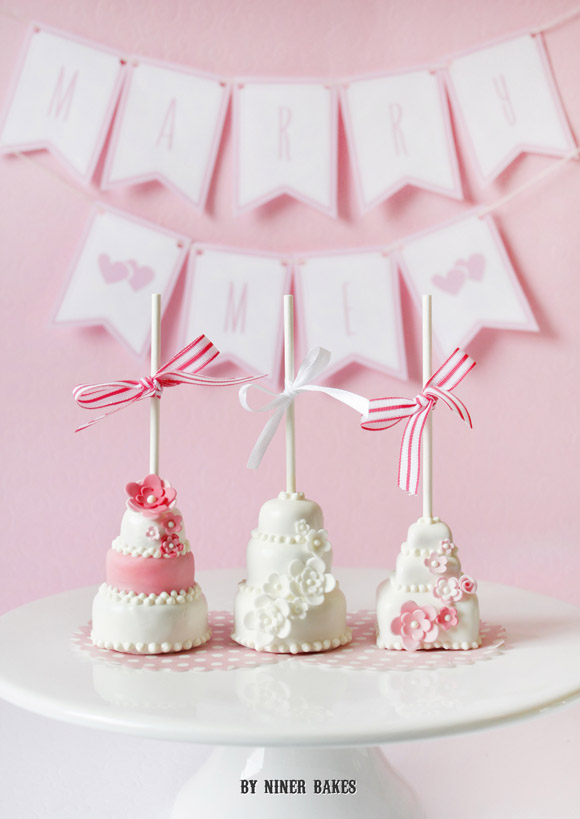
On the photo below you see our coated wedding-cake cake pops. Last steps: Decorating! :)
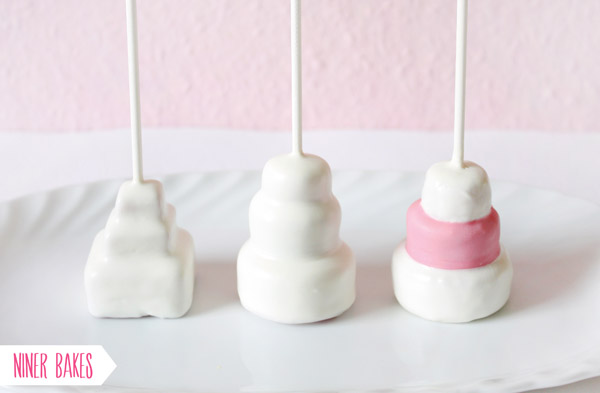
Completely in white…I love the simplicity to this wedding cake – cake pop!
What’s always nice to add to your cake pops, especially when you are giving them away, are ribbons to tie around the lollipop stick.
It makes your cake pops so much more elegant.
Sometimes it is hard to have way too much ribbon to choose from though :)
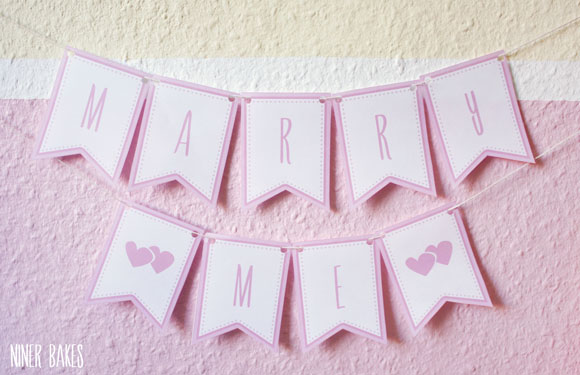
Let’s say you want to surprise the wedding couple with a candy bar, setting up various sweet treats and of course, the wedding cake – cake pops.
What would be sweeter than a cute bunting garland as a backdrop? Either store bought or self-designed, either way, it is going to be beautiful.
I designed & printed out a “MARRY ME <3" garland:
And then I had to do something very brutal.
I absolutely resisted to do it but…my curiousity was not a very good help either.
I admit my responsibility towards my readers and that is why I cut the cake to show you how it looks like inside.
I absolutely love ombre looks – especially pink versions like this one.
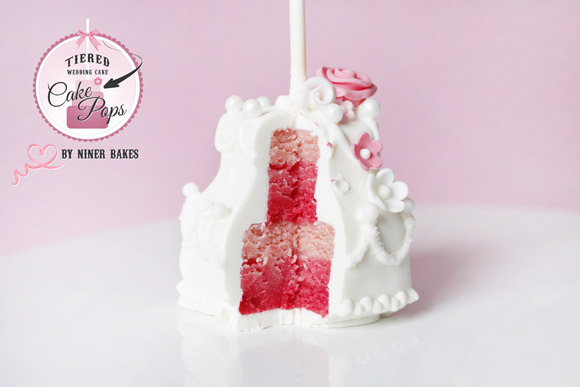
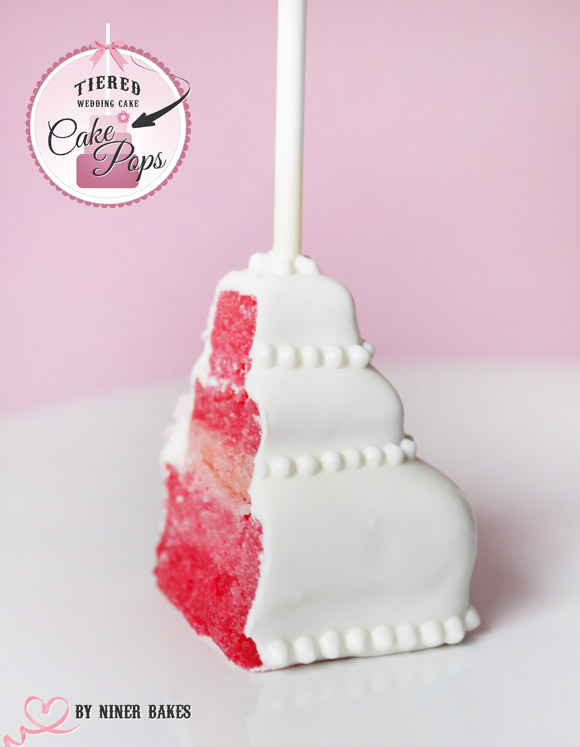
Ouch!
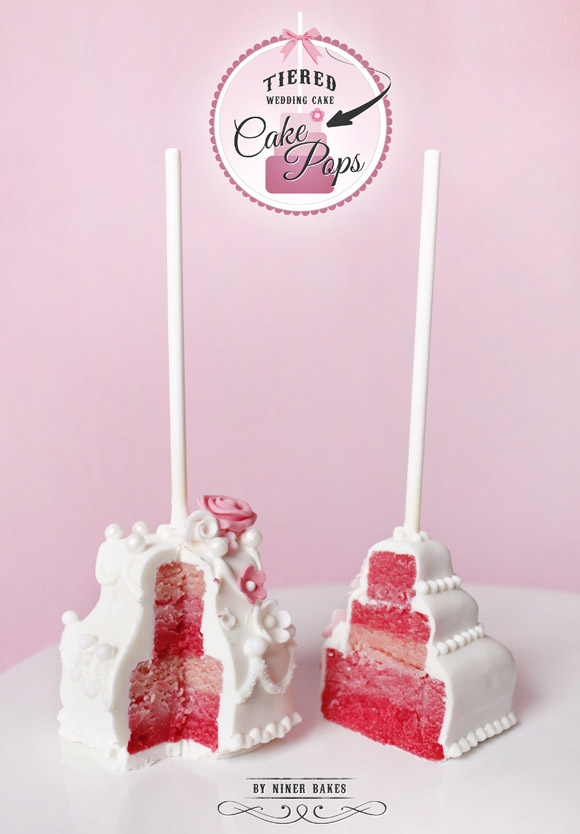
Oh well, it was not that bad at all :) I could not cut all the cakes though, THAT would have been way too hurtful for me.

Something like a Topsy Turvy version?
Will do one again though because sky’s the limit, right :)
If you do make those, please let me know in the comment section below, or even send me a photo to my Facebook Fanpage – would love to see other people’s results!
What would be a special sweet treat for you for your wedding? Or what WAS your special wedding cake at your wedding? Would love to know.
Blessings and marry on :)
niner


")


NINER! these are THE MOST PRECIOUS wedding cake pops i have EVER SEEN!!! LOVE LOVE LOVE them and thank you for being so dedicated to us readers and being brutal to the little guys. i think it was well worth seeing it! heehee :>D
Lisaaa, that is SO super sweet of you!
What a treat to wake up this morning..thanks a million.
Happy you like my wedding pops <3 Thanks for stopping by and letting me know.
Blessings,
niner
Aber wie geht das, dass du mittendrin im turm eines rosa hast??? färbst du alles weiß ein, gehst dann nur bis zur mitte mit rosa drüber und wenn das trocken ist unten nochmals mit weiß? Falls ja, sieht man dann keine farbe durch bzw. ist das unten befindliche weiße nicht stärker als das oben befindliche weiße? über eine antwort würde ich mich freuen!
I love these, so pretty! Can’t wait to try them. Thanks for sharing :)
Thanks Jessica, hope you will show me once you tried them out :)
Love, niner
Oh my god, you are truly an inspiration , I can’t wait till I have time to try these, by the way I noticed from April a girl called monika asked you a question but she wrote it in German , not sure if you understood her but I think she asked how the color of the cake didn’t show through. Anyway thank you for you ideas I think your just fabulous . xx
Thanks SO much Polly!
I will check the comment, sometimes it is easy to forget one or two to respond to lol.
Have a sweet day and hope to see you here again soon.
Blessings,
niner
Hi miss Niner!
Thank you for sharing this wonderful cakepop.. :-) I have tried making cake pops once and I failed.. :-/ but seing and reading this post, I am very much willing to try again.. :-)
<3,
Cams :-)
Hi Cams, I hope you will try again and again, after a while it becomes really easy.
Thanks so much for your comment.
Blessings, niner
Niner, these are just amazing, thank you so much for sharing your creativity!!! I would get married again just to have a reason to make those ;)
Aww Dani, now that’s the sweetest compliment :) Thanks for your lovely comment!
xoxo, niner
Thank you so much for this tutorial. The pops are so cute and beautiful. It really takes a lot of patience to complete such a task! Bravo!
These mini wedding cakes are so beautiful! I cannot wait to have an opportunity to try these out..! Thanks for the great tutorial!
Amazing work. When I saw this on instagram and facebook I had to see how to.
Can’t wait to try it.
Niner, this is such a beautiful blog post! Such an excellent how-to and adorable sweets!
Love this <3 how did you colour the middle tier pink where the top and bottom tiers are white? x
Hi there,
I dipped it in white first, but removed the candy melts from layer 2 and three. Then dipped it in pink candy melts, removed melts from 3rd layer, after that was dry, i dipped the bottom layer. I also tried to run around the 2nd layer in pink with a spoon but that is not such an even result, so your candy melts should be rather runny. Hope that helps.
Blessings..niner
Oh my gosh!!! Tooooo Tooooo adorably cute!!! Love em!!!! What a great awesome tutorial my dear!!! Thank u so much to take the time and do this lovely tutorial!!!
Yaneri
Wow wie immer ein Wahnsinn…ich schau fast jede Woche auf deine Seite, in der Hoffnung das du wieder was neues gemacht hast :)
schade das ich schon geheiratet habe sonst wären die sicher auf meiner liste gewesen.
Unsere Hochzeitstorte war eine Eistorte die aussah wie eine richtige Torte also jetzt nicht kunterbunt sondern richtig schön edel. :) ich muss sagen bei uns war das eine willkommene abwechslung weil das bis jetzt noch keiner hatte und wir doch lange suchten mussten wär für uns da eine Hochzeitseistorte macht.
Cirka ein 18 Monate später hat eine Bekannte geheiratet und denen hat die Eistorte dann so gefallen und auch eine Bestellt :)
und bei deinem Rezept…bei den Zutaten kann man leider nicht auf das Rezept zum Frosting klicken :(
Hallo Niner,
kann ich anstelle von Candy Melts nicht auch ganz normale Schokolade (z.B. von Lindt) benutzen?
Die “Törtchen” sehen übrigens klasse aus!!! Bei uns steht auch eine Hochzeit an und dieses Mitbringsel werde ich auch mal probieren :)
LG
BiMo
Hi BiMo,
danke für deinen Kommentar. Jegliche Kuvertüre kann benutzt werden, klar. Ich bevorzuge für Cake Pops Candy Melts, da der Geschmack und die Konsistenz einfach top sind. Dir sind keine Grenzen gesetzt, happy baking :)
Alles Liebe,
niner
Einfach nur genial! Wow. Kann man auch bei dir bestellen?
LG
Die Hochzeitstante
Hi there,
ganz lieben Dank :)
Ich fertige schon Bestellungen an, jedoch nicht mehr so häufig. Und solche Hochzeitstorten Pops sind zu aufwendig und nehmen viel Zeit in Anspruch, daher verkaufe ich solche eher nicht.
Alles Liebe und viele Grüße,
niner
WOW! Das ist ja mal super schön! Würde ich auch gerne machen, traue es mir aber leider (noch) nicht zu. Aber man lernt ja immer dazu …
Habe in diesem Jahr 5. Hochzeitstag und bis dahin ist noch bisschen Zeit ;-) vielleicht schaffe ich es ja ..
Auf jeden Fall sehr, sehr schön! Hut ab!
Herzliche Grüße
Manuela
Hallo!
Wo bekommt man denn diese Kuvertüre?
Liebe Heike,
klick mal hier, hier gibt es viele Candy Melts (Kuvertüre) zur Auswahl.
Alles Liebe,
niner
Hi Nina,
Im wondering if your pop sticks stay white or you also face problems with discoloration? My sticks more often than not turn yellow and it frustrates me so much im not even in the mood to make pops anymore (and ive made hundreds). Maybe im toovmuch of a perfectionist but to me it just ruins everything. Wilton melts are shit but youre right in Germany theres not much of a choice, CK i only found on one site for a whopping 8.90, just ridiculous – but it is great consistency and color! One more question, the bead border you make of candy melts too?
Hi there Zsoka,
I loved your comment and it made me smile – Auto Correct is a monster, right :D
I will edit your comment though with the right word =)
Lollipop sticks turning yellow, yes it happens and I have had it before. It’s when you use too much frosting to the cake ball mixture. The fat of the frosting seeps into the lollipop sticks and that turns them yellow. Try to use a little less frosting / cream cheese?
The beaded border are candy melts as well, I piped them on the cake pop. You can use sixlets or any other candy and attach those.
Wish you a great day!
niner
Hiya, thx for the answer. I could never decide if the discoloration happens because of the dough or the melts to be honest cos the melts are so fatty too. I will try less icing but normally then the dough falls apart. It actually happens mostly with my lemon pops. Did you try plastc sticks? Theres many colors available though not in Germany it seems. I wonder if those would work better! Zs.
halli niner, toll gemacht !!! Wo kaufst du die bright White melts? Hast du da einen bestimmten shop?? lg Sandra ach ja weiter so.
Hi Sandra, ganz lieben Dank!
Meine weißen Melts kaufe ich oft bei Amazon.de oder cake-pops.de
Alles Liebe,
niner
Hallo, darf ich fragen wo das Rezept für das Frosting hierzu ist?! Ich kann es nicht finden :(
Vielen Dank!!!!
Hi Christin, du kannst jegliches Frosting nehmen oder schau doch mal hier :)
Alles Liebe,
niner
Hi Niner, great job on the cake pops – you are truly an inspiration. I tried to make them tonight, but my candy melts didn’t become a runny consistency, it stayed kind of thick & once I dipped them I couldn’t really see the layers – it was just a white blob on a stick, lol. Did you run into this problem or do you have any suggestions on making the candy melts runnier?
Hi Iana, lots of people have these problems, but there is help! :)
Please read my cake pops troubleshooting guide, you will find many answers there.
CLICK HERE please.
Good luck for next time, Iana. Have a great weekend,
niner
Hi again, I must apologise , just reading through you comments and realise your German is perfect. Sorry just a silly woman from Ireland!
Hi Polly, all is good, thanks for letting me know though! :)))
Halli hallo,
eine echt tolle Idee.. bin am überlegen die cake poPS ALS GIVE AWAYS für meine hochzeit zu nehmen.. daher meine frage:
wie lange im voraus kann ich sie machen? also wie lange sind sie haltbar und schmecken noch? denke, dass es in den letzten tagen vorher wahrscheinlich ein bisschen stressig wird…
danke! und lg
Hallo liebe Tina,
wenn du zum Beispiel Oreo Cake Pops machst, dann kann ich dir eine Sicherheit geben von mind. 1,5 Wochen. Wenn sie gekühlt sind, alles kein Problem.
Bei normalem Kuchen habe ich die Zeit noch nie getestet, daher kann ich es dir nicht sagen, wobei ich solche auch schon 1 Woche im Voraus gemacht habe, also sollte auch dies kein Problem sein :)
Alles Liebe und happy baking!
niner
Love your ideas. I can’t wait to try the wedding cake pops!
Hi Niner,
What type of frosting works best for the cake pops?
I just needed to tell you, how excellent I think you are. I’m deeply in love with your page and all your work. Wow…it’s amazing! Thank you for sharing such amazing treats and great ideas. So many things I want to try and make after seeing you recipes and tutorials. I will never be the same again ;-) Thank you <3
Marie,
that was so so lovely, absolutely happy about your comment.
Thanks SO much for liking my blog, hope to see you here more often,
many blessings to you!!
niner
You are a genius, and these cake pops are the bomb-diggity. I cannot wait to try them! Thank you so much for sharing your genius! <3
Karo,
thank you SO much.
I had to laugh out loud because your comment is really my type of style lol..Thanks so much!
Hope to see you here again.
Much Love,
niner
hi.. Niner. u r just awsummmmmmmmm!!! ur work is so neaaat n cleaan n perfect… i love ur creations!!!
plz tell me how can i make these flowers! i couldnt find this gumpaste in my town… whats dis? can i make it at home ??
How beautiful! And I mean both YOU and your creations. Everything was very easy to follow. Thank you for your kindness and sharing.
Hi, how far in advance can I make these before giving them away? Thanks.
I would say a week is fine :) keep them refrigerated and there should be no problem.
Wow, thanks for sharing! I will make 100 of these for my cousin’s wedding in Oct!
Wow good luck and hope they turn out perfect. Much love!
Hi Niner!! What do you use to pipe your cake pops? Frosting? Candy melts? I heard that people use candy melts, but when I tried that, the melts kept hardening pretty quickly which make it hard to pipe little details! And when I tried royal icing, it flakes off after barely touching once it’s dry. Help!!
Thank you so much for uploading this idea I am going to try and do this for my bridal shower ????????????????
Hi there!
I absolutely LOVE this cake pop design. Easily my number one look for cake pops and more so excited to give it a shot
Quick question.. what cutter do you use for the circular and square shaped can layers? What is their width as well so that I can try to find something similar to use here.
Thanks!
Val
How tall are the three tiered wedding cake pops. Also, can I dip all the cake pops first, then decorate them with the fondant flowers? The fondant flowers have to be pretty small, right? How do I attach the beads to the center of the flowers? When it comes to storing them, how do I store them? In the fridge? Do they have to be on a sealed container?